Quick Start Guide
This Quick Start Guide will give you everything you need to start using boosters to reinforce all of the training programs within your organization. If you need extra help, you can find context sensitive help on every page. Just click the helpful question mark icons.
The Science of Boosting
BoosterLearn allows you to reinforce training by providing your employees with daily boosters that encourage their brain to retain essential information.
Logging In
Go to https://boosterlearn.com and enter your username and password.
Settings
The first thing you'll want to do with a new account is to customize your organization settings. In the Settings page, you can customize the sender name and email address that will be displayed on every booster email.
You should also change the header image, which displays on learner boosters and at the top of your dashboard. The banner file can be png, gif, jpg, or jpeg and must be less than 200 MB. The recommended size is 940x112 and the best ratio is 8:1.
You may also choose to design a footer that will appear in every booster email. This may be simple text, or you can get creative with images and styling.
The Settings page additionally allows you to update your account information including email address, password, and time zone.
Booster Programs
A "booster program" is a series of boosters scheduled for release in the days and weeks after a training. You can create a booster program to support instructor-led courses, reading assignments, and computer delivered lessons.
Creating a new booster program is an easy, four step process.
Step 1: Booster Properties

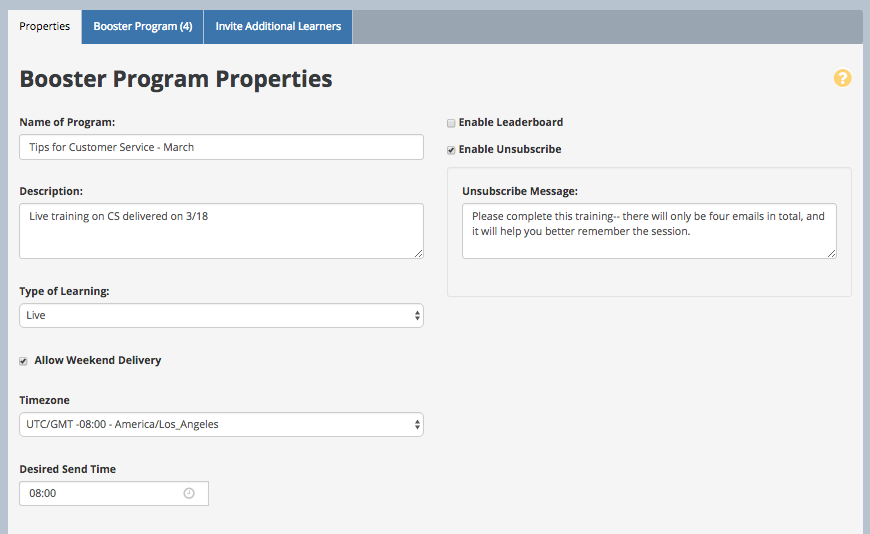
1. Name your training program. This name will be included in the subject line of your booster emails, so provide a title that is short and descriptive.
2. Provide a brief description of this program. This field is for internal use only, so write a description that will help you differentiate between your different programs.
3. Also for your internal reference, select the type of training that this followup is supporting (e.g., live, e-learning, etc.).
4. You can toggle the Leaderboard for participants in this program. If the box is checked, participants will be able to see their progress tracked against the other participants in the program. If it is unchecked, the leaderboard will not be visible to participants.
5. You have the option of allowing your participants to be able to unsubscribe from a program. In a program's properties, you can toggle this functionality and provide a custom message a participant will see upon attempting to unsubscribe, before confirmation.
6. Last, you can set a time that is the earliest at which your boosters will be sent out each day, for instance to prevent your participants from receiving emails outside of work hours
Step 2: Creating Boosters
Optional: Starting with a Burst

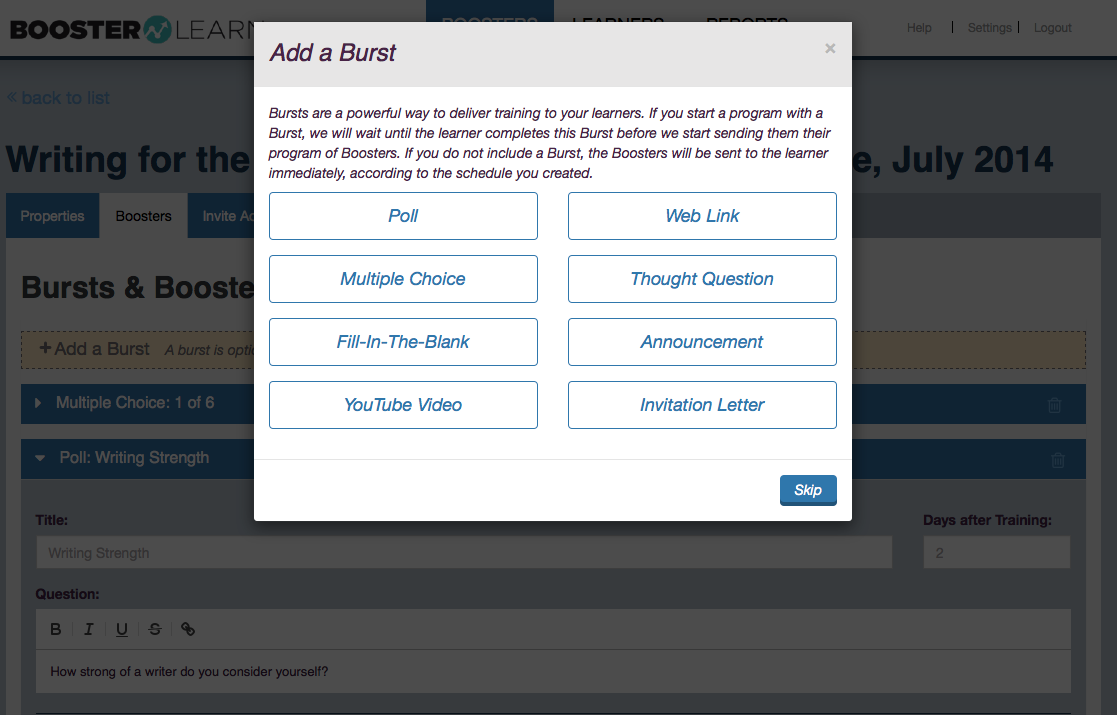
Bursts are useful for delivering core information before embarking on a reinforcement program. You can decide to start any program with a burst experience and the burst must be completed before the booster program is commenced. For example, you could send a YouTube burst to your learners. Each participant's booster experience would begin only after they view the video. Bursts can include a variety of experiences such as announcements, videos and quizzes.
A burst can also consist of an invitation letter. When a learner accepts their invitation, their program will be scheduled as designed with the day of the acceptance being Day 1. If you want, you can customize this letter. Make sure the learner is aware of the benefits of participating in a booster program and that they need to accept the invitation to begin receiving their boosters.
Bursts are entirely optional. If you do not create a burst, then the program of boosters will automatically be sent to the learner according to the schedule you create.
Adding Boosters
Now it's time to add boosters to your program. Click the "+ Add a booster" button and select what type of booster you'd like to send out from the pop-up window.

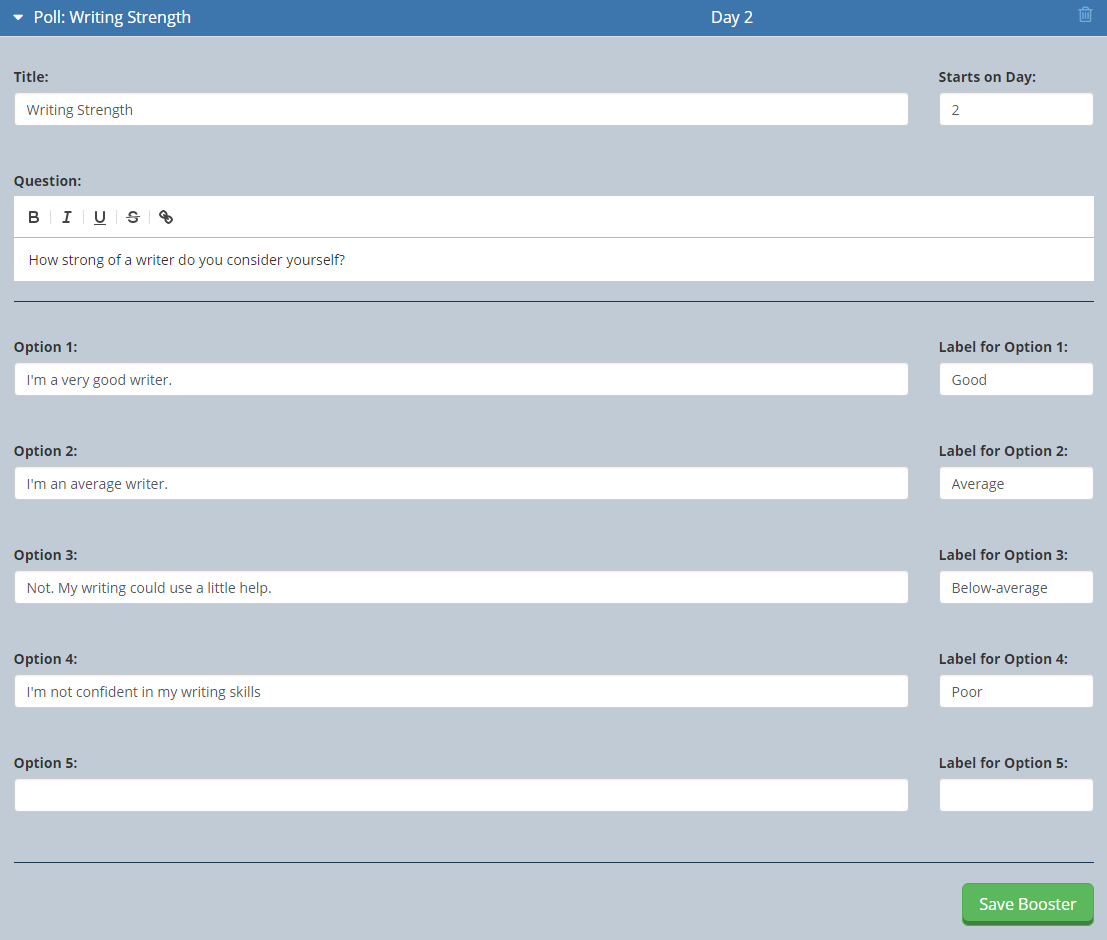
1. Put in the title of the booster.
2. Enter how many days into the program you'd like this sent out. For instance, if you'd like it sent on the day of launch, or the day that the learner accepts their invitation email, enter "1." If you want it send two weeks after launch or acceptance, enter "14."
3. Write thoughtful but concise content. Strive to make the experience engaging, informative and brief. If possible, make it fun.
4. Finally, make sure to provide the learners with ample feedback. Notice that, for multiple choice questions and fill in the blank questions, you can add feedback for incorrect and correct answers. Take the time to explain a common misconception, provide a hint, or point to further resources for the interested learner.
There is a science and an art to authoring effective booster programs. We encourage you to read this article by Dr. Kohn for insights and detailed strategies.
Step 3: Enrolling Learners
Now you need to enroll learners into that particular program. Click on the program tab labeled Invite Additional Learners
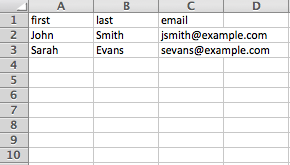
- You can add learners to your program by adding them manually, one-by-one, by choosing them from the list of learners in your organization, or by batch adding them using a CSV file. The easiest way to create a CSV file is by exporting it from Microsoft Excel (or other spreadsheet) using the Export CSV function. Make sure to arrange the spreadsheet so that it looks like the following:
- The learners you plan to invite into the program will be listed in the table at the bottom of the page.

Step 4: Delivering Boosters
The final step in creating a booster program is to review the program summary and schedule the date that you will send out the first booster or invitation. Click on the 'Launch Date' box and select a date from the pop-up calendar. The boosters will be sent out in the order you specified. If you added an invitation or burst, day one will be the day the learner accepts the invitation or completes the burst.
Note: Make sure all of your boosters are complete before launch. If you decide you want to add more boosters once the program is in motion, previously enrolled learners will miss out on that particular booster. The best course of action is to have all the boosters in the training program complete before you invite any learners.
Last, you have the option to employ a 'Self-Enrollment Link' for each program. If you enable this option, you are provided with a link to provide to your learners, through which they can sign up to automatically receive the boosters for that training. 
Manage Learners
The LEARNERS page allows you to enroll learners into your organization. Once they've been added, you can easily enroll them into programs that you create. (You can also enroll learners directly from the Program page if you prefer).
The manage learner page will also allow you to edit learner information by double-clicking on the specific field you wish to update.
Reports
BoosterLearn provides extensive reports that let you monitor the success of your programs and learners. When you click on REPORTS, you will see the All Programs report. These dynamic graphs will allow you to gauge participation and performance across all of your programs.
Click on the Individual Programs tab to review participation and performance in individual programs. If you scroll down the page, you will be able to open a detailed report. In List View, you can see a general overview of how people answered each of the boosters in this program. In Table View, you can see each of the program's boosters listed in chronological order. The Participation Timeline is a great way to see how each of your participants is interacting with the narrative of the Program.
Click on the Engagement Index tab to see a rank order of the performance of learners within your organization. You can sort this list by clicking on the titles of each of the columns including Participation (whether or not they interacted with each booster), Mastery of Knowledge (whether they answered a booster correctly or incorrectly), and Total points.
API
BoosterLearn does provide an API for reporting participation to your Learning Management System. For more information, enquire with your Client Success representative.
For more technical information, please visit the Technical Help page.